
As someone deeply involved in acrylic bathtub manufacturing at Salvere, I've seen firsthand how homeowners and designers grapple with optimizing bathroom spaces. A common challenge is integrating a bathtub beautifully and functionally within a shower area. It’s a design choice that, when executed well, can transform a bathroom from merely practical to utterly luxurious, especially in compact homes.
Choosing the perfect bathtub style for your shower space involves a careful balance of aesthetic harmony, functional layout, and practical considerations like waterproofing and drainage, especially when combining these two essential bathroom elements. Popular styles that work well include compact alcove tubs for efficiency, or even elegant freestanding tubs within a large wet room for a luxurious, open feel. Material choices like acrylic are ideal for their durability and warmth in these combined zones, ensuring optimal comfort and seamless integration.
Let's explore how to choose the ideal bathtub style for a combined shower space.
Why Combine a Bathtub with a Shower Area?
It's all about maximizing space and functionality.
Combining a bathtub with a shower area maximizes bathroom functionality and optimizes limited space, offering both quick showering convenience and luxurious soaking options within a single zone. This design choice is particularly beneficial for smaller bathrooms, family homes requiring versatile bathing solutions, and for creating a high-end, open wet-room aesthetic that enhances property value and user experience.
This design trend isn't just about looks; it's born out of practical needs and a desire for flexible living.
- Space Efficiency: This is the primary driver, especially in urban homes or smaller bathrooms where fitting a separate tub and shower isn't feasible. Combining them into one "wet zone" makes the most of every square inch.
- Versatility for Households: It's ideal for families. Kids often prefer baths, while adults might prefer quick showers. A combined unit offers both options without needing two separate fixtures.
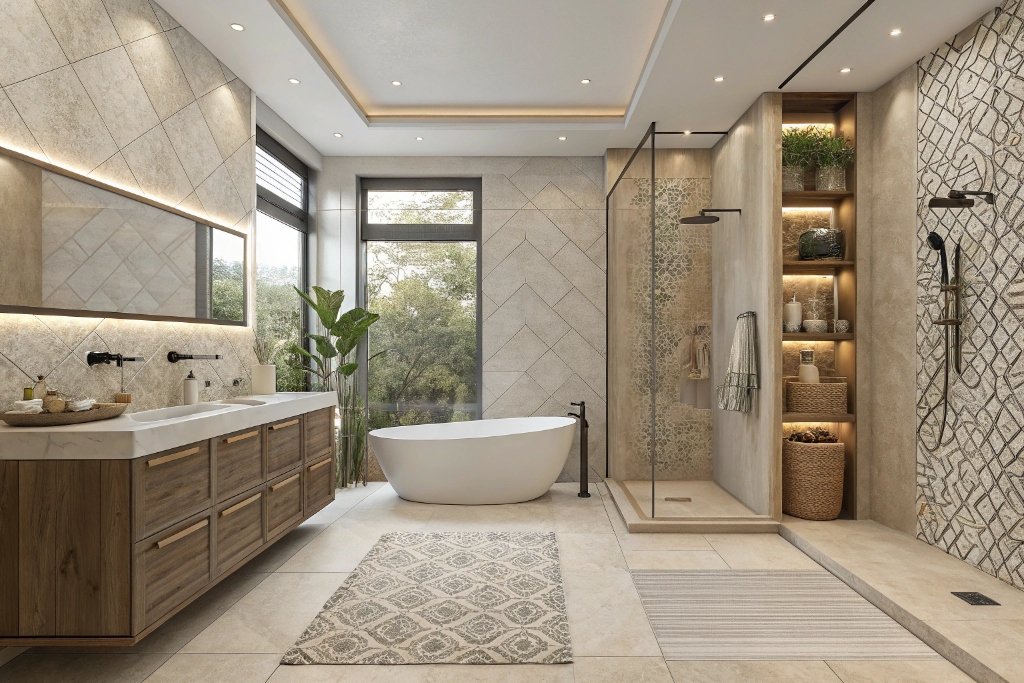
- Open Concept Design: In larger bathrooms, integrating a freestanding tub within a spacious walk-in shower—creating a true wet room—offers a luxurious, open, and minimalist aesthetic.
- Cleaning Convenience: With proper waterproofing, the entire area can function as one cohesive unit, making cleaning potentially easier as surfaces are designed to get wet.
- Enhanced Property Value: A well-designed bathroom with both a tub and a shower, even if combined, is often seen as a desirable feature by potential buyers.
The combined tub and shower area is a smart solution that caters to modern needs.
Layout Considerations: Assessing Your Bathroom Space
Measure twice, design once.
Assessing your bathroom space is critical for successful tub-shower integration, requiring precise measurements of length, width, and ceiling height, along with careful consideration of door swings, window placements, and existing plumbing. You must account for adequate clearance for movement, shower heads, and faucet placement, ensuring the chosen bathtub style seamlessly fits the physical dimensions and functional requirements of your specific bathroom layout.
Before you choose any tub style, you need to thoroughly understand your bathroom's limitations and possibilities.
- Exact Measurements:
- Length and Width of the Room: This determines the maximum footprint available.
- Ceiling Height: Crucial for shower heads and overall ventilation.
- Available Wall Space: For mounting shower fixtures, shelving, or enclosing the wet area.
- Obstructions:
- Doors and Windows: How do they open? Will they interfere with the tub or shower door? Ensure windows are suitable for a wet environment if they fall within the shower zone.
- Existing Plumbing: Where are the current water lines and drain located? Moving them can be costly.
- Clearance and Traffic Flow:
- Walkways: Ensure there's adequate space (at least 24-30 inches) around the tub and shower for comfortable movement.
- Entry/Exit: How will you get in and out of the combined area? Will a barrier-free entry be possible?
- Enclosure:
- Shower Door vs. Open Wet Room: Will the area be fully enclosed with glass, or will it be an open-concept wet room with a trench drain? This affects wall coverings and waterproofing.
A meticulous assessment prevents costly mistakes and ensures the final design is both beautiful and practical.
Popular Bathtub Styles That Work Well with Showers
Versatility in design.
Several popular bathtub styles seamlessly integrate into combined shower spaces, each offering unique benefits: standard alcove tubs provide efficient, familiar shower-over-tub functionality; drop-in tubs allow for custom surrounds and design flexibility; back-to-wall freestanding tubs offer a sleek, modern aesthetic with space-saving installation; and compact Japanese soaking tubs deliver deep immersion in minimal footprints, all while serving as functional bases for overhead showers.
Here are the most common and effective bathtub styles for integration with a shower:
- Alcove Bathtubs:
- Description: The most classic "shower-over-tub" setup. The tub is installed into a three-walled recess.
- Why it works: Extremely space-efficient, it utilizes existing wall space and provides a sturdy base for shower walls and fixtures. Often the most budget-friendly option.
- Ideal for: Small to medium bathrooms, family bathrooms, budget-conscious renovations.
- Drop-in Bathtubs:
- Description: The tub basin is "dropped into" a custom-built frame or deck, which is then tiled or finished.
- Why it works: Offers more design flexibility than an alcove tub. The deck can be extended to create ledges for shower products, or integrate seating. The entire deck and tub area can be fully waterproofed as a wet zone.
- Ideal for: Medium to large bathrooms, custom designs, creating a more cohesive tiled aesthetic.
- Back-to-Wall Freestanding Bathtubs:
- Description: A freestanding tub that has one flat side designed to sit flush against a wall, allowing for wall-mounted plumbing and a showerhead.
- Why it works: Gives the elegant look of a freestanding tub while saving space and simplifying plumbing compared to a traditional freestanding tub. It creates a sleek, modern wet zone.
- Ideal for: Medium to large bathrooms, contemporary designs where a freestanding look is desired without full design flexibility.
- Japanese Soaking Tubs (Ofuro):
- Description: Deep, often compact tubs designed for upright, full-body immersion.
- Why it works: Their small footprint makes them excellent for very small bathrooms. A wall-mounted shower can easily be integrated above, creating a deep bath and a functional shower in a minimal area.
- Ideal for: Tiny bathrooms, those seeking deep relaxation in a compact footprint, modern minimalist designs.
Each style presents specific advantages depending on space and aesthetic goals.
Freestanding Tubs in Shower Zones: Pros and Cons
A luxurious choice with considerations.
Placing a freestanding tub within a shower zone offers a luxurious, open wet-room aesthetic, enhancing perceived space and creating a spa-like retreat. However, this design demands extensive waterproofing, meticulous drainage, and often a larger overall bathroom footprint. While it simplifies cleaning of the wet area and makes an undeniable design statement, potential cons include higher installation costs, water splashing outside the zone, and the need for careful material selection to withstand constant moisture.
This is an increasingly popular, high-end design choice, but it requires careful planning.
Pros:
- Luxurious Aesthetic: Creates a stunning, open, and modern spa-like experience. The tub becomes a sculptural element within the shower space.
- Visual Spaciousness: Removing a separate shower enclosure can make a bathroom feel significantly larger and less cluttered.
- Simplified Cleaning: With proper waterproofing, the entire area is designed to get wet, simplifying cleaning as you don't have to worry about water splashing out of a small shower enclosure.
- Flexibility in Placement: Within the wet zone, the freestanding tub can be positioned to optimize views or flow, unlike fixed alcove tubs.
- No Shower Curtain/Door: This eliminates a common cleaning chore and a visual obstruction.
Cons:
- Extensive Waterproofing Required: The entire shower zone, including walls and floor, needs to be meticulously waterproofed and sloped to a drain. This is a critical and costly step.
- Larger Bathroom Footprint Needed: While it feels more open, it typically requires a larger bathroom to accommodate both the tub and a spacious enough shower area without feeling cramped.
- Drainage Complexity: Often requires a linear drain or multiple drains to manage water effectively across a larger floor area.
- Splashing Concerns: Even in a large wet room, water can still splash further than anticipated, potentially on towels or bath mats outside the immediate zone if not properly contained.
- Installation Costs: This option generally has higher installation costs due to the waterproofing and
If you have the space and budget, a freestanding tub in a shower zone can be a breathtaking addition.
Material Matters: What Works Best in Wet Zones?
Durability meets design.
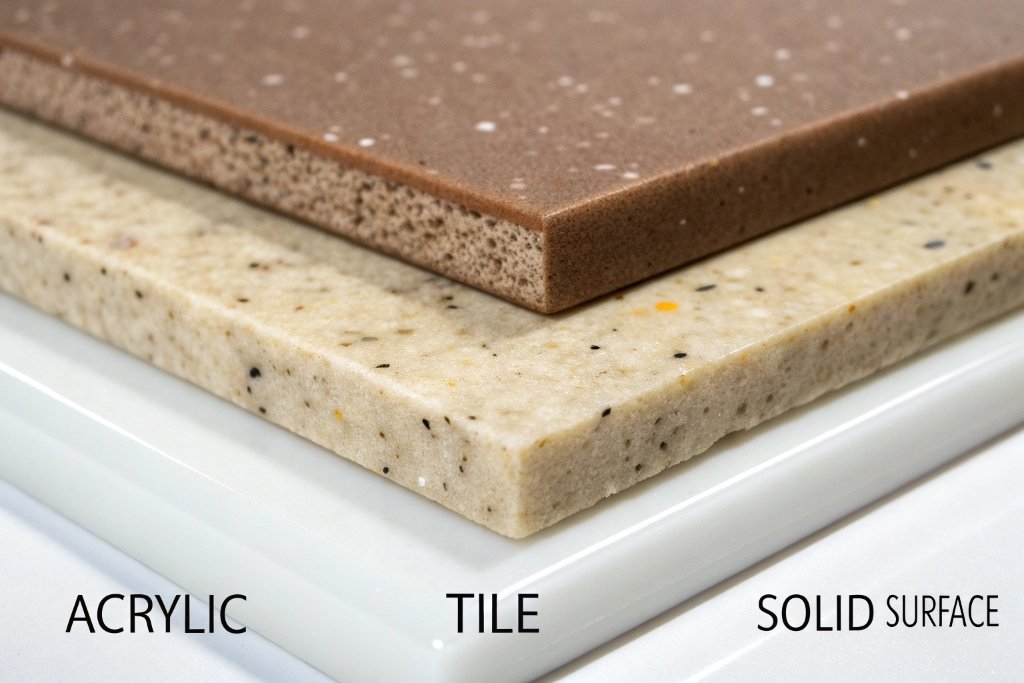
In combined tub-shower wet zones, material selection is paramount for durability, waterproofing, and aesthetics. Acrylic is highly recommended for bathtubs due to its non-porous nature, warmth to the touch, and resistance to mold, mildew, and impact. For surrounds, large-format porcelain or ceramic tiles, solid surface panels, and waterproof concrete are excellent choices, offering robust protection against constant moisture, ease of cleaning, and design versatility, ensuring longevity and seamless integration.
When the bathtub is directly within the shower's splash zone, material selection becomes even more critical for both the tub and its surroundings.
For the Bathtub Itself:
- Acrylic (Recommended):
- Pros: Lightweight, non-porous (prevents mold/mildew), warm to the touch, excellent heat retention, durable, easy to clean, highly versatile in shape and color, excellent value. Being non-porous means it won't absorb water even with constant exposure. Salvere exclusively manufactures acrylic tubs for these reasons.
- Cons: Can be scratched (though easily repairable).
- Solid Surface:
- Pros: Seamless look, non-porous, durable, customizable, repairable.
- Cons: Heavier and often more expensive than acrylic.
- Cast Iron (Porcelain Enamel):
- Pros: Extremely durable, excellent heat retention, traditional look.
- Cons: Very heavy, cold to the touch, can chip (repair is difficult).
For Shower Walls and Floor (within the wet zone):
- Large Format Porcelain or Ceramic Tiles:
- Pros: Extremely durable, waterproof (once grouted and sealed), vast array of design options, easy to clean. Large tiles mean fewer grout lines.
- Cons: Grout lines require maintenance; installation can be complex.
- Solid Surface Panels:
- Pros: Completely seamless (no grout lines), non-porous, highly durable, customizable, easy to clean.
- Cons: More expensive than tile; specific installation requirements.
- Waterproof Paneling (e.g., PVC composite):
- Pros: Quick installation, no grout lines, easy to clean, lightweight.
- Cons: Limited design options compared to tile; can sometimes look less high-end.
- Natural Stone (e.g., Marble, Travertine):
- Pros: Luxurious, unique, timeless aesthetic.
- Cons: Porous (requires regular sealing), higher maintenance, very expensive, heavy.
Always prioritize waterproof backing, proper sealing, and professional installation when dealing with wet zones.
Drainage and Waterproofing Tips for Combined Areas
Protection is paramount.
Effective drainage and meticulous waterproofing are non-negotiable for combined tub-shower areas to prevent water damage and ensure longevity. Key tips include sloping the entire wet-room floor towards a linear or central drain, installing waterproof membranes or cement board as sub-surfaces on walls and floors, employing proper liquid waterproofing compounds and sealants at all seams, and using high-quality, water-resistant tiling or paneling. Prioritizing these measures from planning to execution guarantees a safe, durable, and leak-free integrated bathing space.
This is perhaps the single most critical aspect. Without proper drainage and waterproofing, you're inviting disaster.
- Slope the Floor: The entire floor of the wet zone must be sloped towards the drain. This ensures all water flows away and doesn't pool. A minimum slope of 1/4 inch per foot is standard.
- Choice of Drain:
- Linear Drain: Excellent for wet rooms, often allowing for "curbless" entry. It effectively collects water over a longer length.
- Central Point Drain: Requires the floor to be sloped from all directions to this single point.
- Waterproof Membranes: This is non-negotiable.
- Underlayment: Use cement board or specialized waterproof wall board (like Kerdi-Board) on all walls and floors within the wet zone.
- Liquid Waterproofing: Apply a liquid rubberized membrane (e.g., RedGard, Kerdi-Liquid) over the cement board, paying special attention to corners and seams.
- Sheet Membranes: Products like Schluter-Kerdi are fabric membranes that create a continuous waterproof barrier.
- Proper Flashing and Sealing:
- Around the Tub: Ensure the interface between the tub's flange (if it has one) and the wall/floor membrane is completely sealed.
- Penetrations: All pipe penetrations for faucets, shower heads, etc., must be sealed with waterproof collars or sealants.
- Glass Enclosures: If using glass panels, ensure the seals and tracks are waterproof and properly installed.
- Materials: As discussed, use only materials rated for wet environments (i.e., porcelain tile, solid surface) and ensure grout is sealed, especially if using cement-based grout.
Invest in professional installation and the best waterproofing products you can afford. This is where cutting corners costs you dearly.
Customization Options for Seamless Tub-Shower Integration
Your vision, realized.
Customization options for seamless tub-shower integration allow for tailored solutions that harmonize aesthetics and functionality in combined bathing spaces. These include custom acrylic bathtub dimensions and shapes designed for specific alcoves or wet rooms, integrated benches or shelving within the shower surround, personalized tile or solid surface finishes, and bespoke lighting or niche placements. This tailored approach ensures optimal flow, maximizes usability, and perfectly matches the unique design vision and practical needs of any bathroom.
Customization allows you to truly make the combined tub and shower area your own, optimizing it for your specific needs and aesthetic.
- Custom Bathtub Dimensions:
- Acrylic Flexibility: At Salvere, we can produce acrylic tubs in custom lengths, widths, and depths. This is incredibly useful for fitting an otherwise awkward niche or maximizing a tight space.
- Integrated Features: We can also incorporate custom armrests, headrests, or even ergonomically designed built-in seats into the tub's shape itself.
- Custom Surrounds and Decking:
- Built-in Benches: A tiled or solid surface bench within the shower area provides a place to sit or prop a leg for shaving, seamlessly blending with the tub surround.
- Recessed Niches: Custom-sized and placed niches in the shower wall keep toiletries organized and out of the way, avoiding unsightly caddies.
- Integrated Shelving: If using a drop-in tub, the deck can be extended to form shelves or ledges within the shower.
- Lighting and Fixture Placement:
- Recessed Lighting: Strategically placed, waterproof recessed lights can highlight the tub area.
- Custom Faucet Placement: Wall-mounted or deck-mounted faucets can be positioned for optimal reach and aesthetics. Consider a hand shower for convenience.
- Material and Finish Coordination:
- Matching Tiles/Panels: Use the same tile or solid surface material for the shower walls, tub surround, and even the bathroom floor for a cohesive, seamless look.
- Accent Walls: A custom accent tile wall can define the shower area within the larger wet room.
- Shower Enclosure Design:
- Custom Glass Panels: Tailored glass panels (fixed or sliding) can perfectly fit an irregularly shaped opening or incorporate unique patterns.
- Curbless Entry: For a truly seamless look and improved accessibility, a curbless shower entry can be designed.
Customization ensures that your combined tub and shower space is not only visually stunning but also perfectly functional and comfortable for your unique lifestyle.
Conclusion
Integrating a bathtub into a shower space is a smart design choice that requires careful planning but offers significant rewards. By considering your layout, selecting the right tub style and materials, and prioritizing meticulous waterproofing and customization, you can create a seamless, functional, and luxurious bathing zone that enhances your home for years to come.
👉 Learn more about Salvere Bath OEM/ODM capabilities
and how we manufacture acrylic bathtubs in Vietnam.

